How to Set Up Tracking Template in Bing ADS
Before advertising accounts can be placed, conversion tracking code needs to be installed on the website. By converting data, one can know which specific advertisement, keyword, advertising group, or advertising series the conversion comes from. This feature can help us understand how to effectively advertise and improve the effectiveness of advertising placement.
Next, we will explain how a new account should create a conversion event tracking.
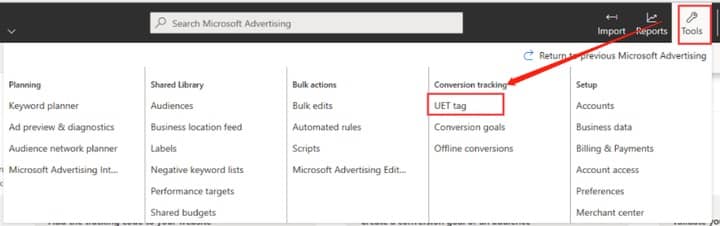
Step 1: Create UET code
1. In the top menu bar of the account operation interface, click on Tool Settings Tool>and then click on UET tags
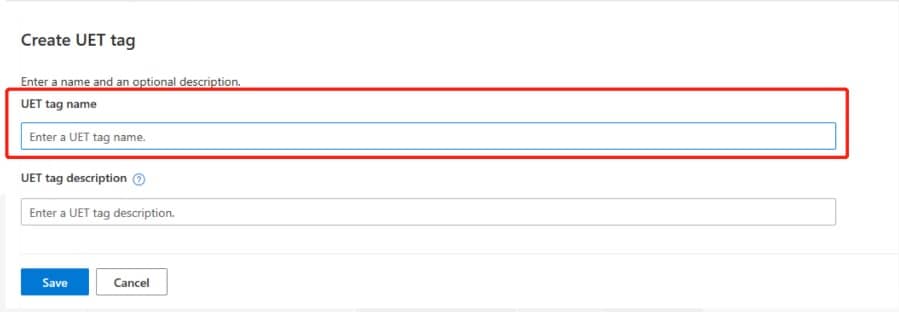
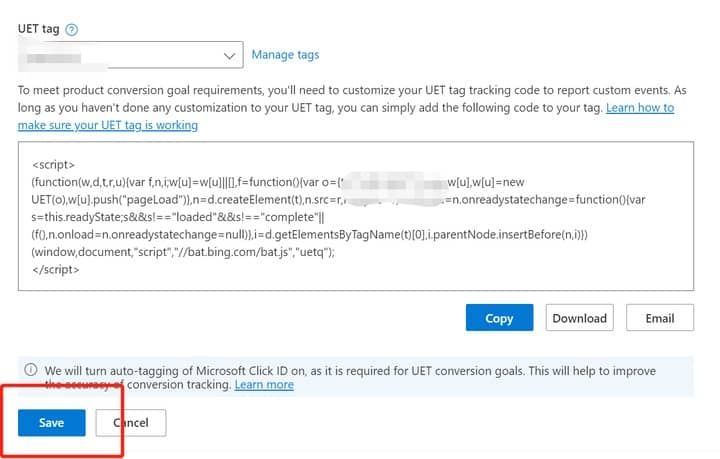
2. Click on Create UET tag, enter the tag name, and you can enter the website domain name for easy query and management. Then click Save.
3. After saving, the system will generate a section of code, which is Bing’s UET code, equivalent to Google’s global code. Copy the code and send it to the technical installation team to install it on all pages of the website.
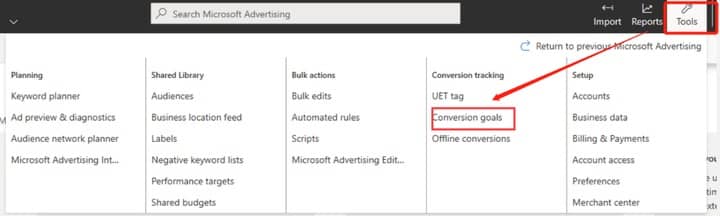
Step 2: Set up conversion tracking (taking sending inquiry conversion as an example)
1. In the top menu bar of the account operation interface, click Tool Settings Tool>and then click on Conversion goals.
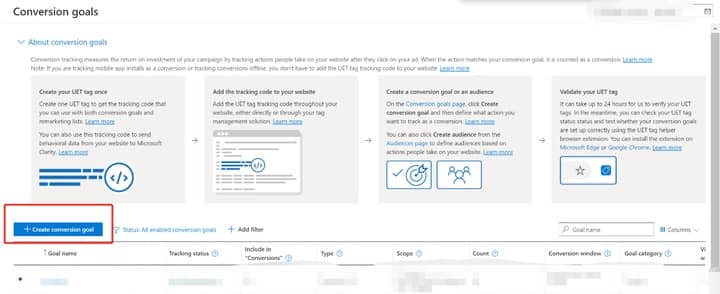
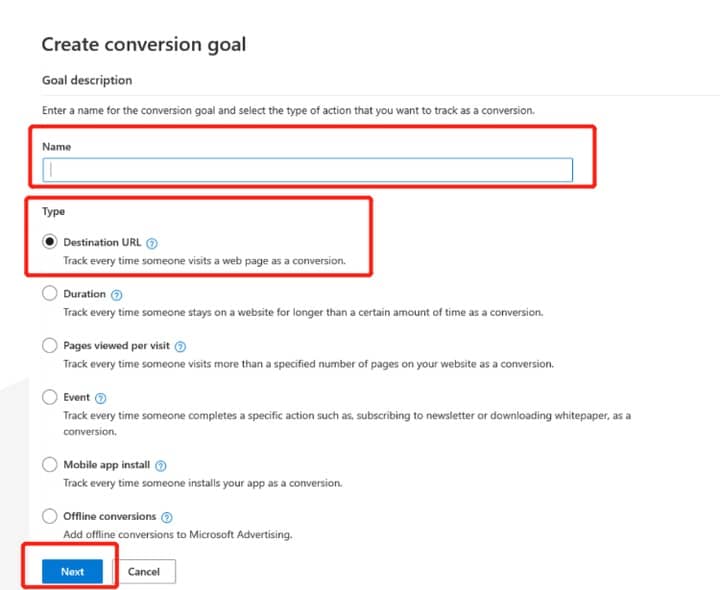
2. Click on Create conversion goal to create a new conversion event.
3. Set the name of the conversion event>Select the conversion event type, taking webpage loading as an example (after successfully sending the inquiry, it will automatically jump to a webpage link containing specific fields), select Destination URL>click Save to proceed to the next step.
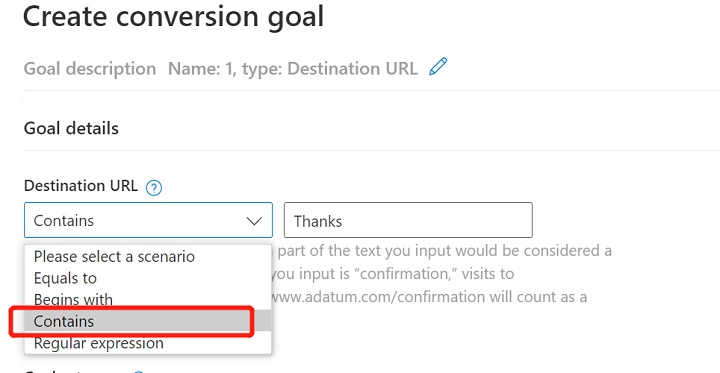
4. Select the matching method for the webpage, as shown in the following figure, which means that after successfully submitting the inquiry, it will redirect to the webpage link address containing the “Thanks” field. The number of visits to a webpage containing the “Thanks” field can be counted as the number of conversions for inquiries.
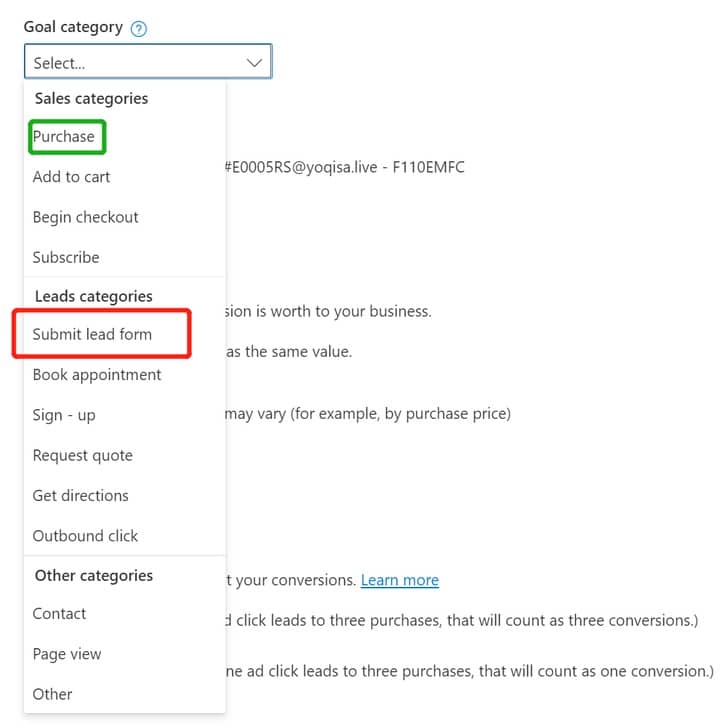
5. Select the conversion category. In this case, taking inquiry conversion as an example, simply select the submit lead form. (If it is a C-end website, you can choose Purchase, which means “purchase” conversion)
6. Choose whether to track the value of statistical conversion. This case takes inquiry conversion as an example and directly chooses not to track the conversion value Don’t assign a value. (If it is a C-end website and each order has a different value, you can choose the second option, Conversion action value may vary, to track the different values of each order)
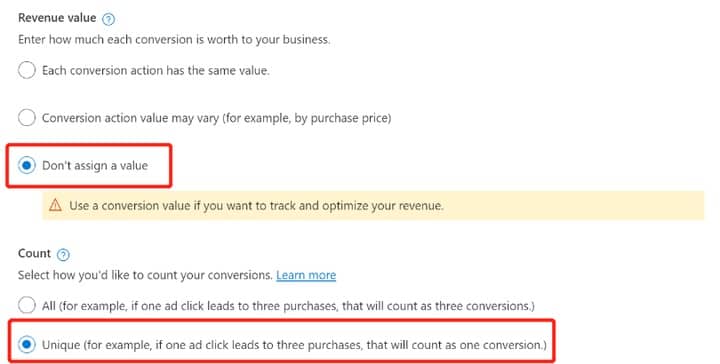
7. Choose the method for counting the number of conversions. This case takes inquiry conversion as an example, simply selecting Unique means that no matter how many inquiries the same user submits, they will only be counted as one conversion. (If it is a C-end website, a user may place multiple orders. Here, you can choose All to convert each order and calculate the different values of each order.)
8. Finally, the website will generate a section of UET code, and an account only needs to install the UET code once. The global code has already been installed once in the first step, so click Save.
The above is the process of installing conversion tracking. Next is the official description of Bing ADS.
What is Tracking Template: A template where you define URL tracking. You can enter either of these items:
- {lpurl} followed by URL parameters and custom parameters which are separated by an ampersand (&). For example, {lpurl}?matchtype={matchtype}&device={device}
- The URL you received from a third-party tracking tool or service. For example, http://www.trackingc.com/?url={lpurl}&id=5
Why it’s important: When your ad is served, the tracking information is dynamically appended to your landing page URL.
What you need to know about Tracking Template: You can add a tracking template to your Account > Campaign > Ad group > Ad > Keyword > Sitelink Extension (highest to lowest level). When your ad is served, the tracking template at the lowest level is used.
Create an account tracking template
URL tracking allows you to find out how visitors got to your website and gives you more information about the source of an ad click. All you need to do is add URL parameters to your tracking template and then when your ad is served, the parameters are dynamically appended to your landing page URL.
For search campaigns, you can add tracking templates at these levels:
- Account
- Campaign
- Ad group
- Ad
- Keyword
- Sitelink Extension
For Microsoft Shopping Campaigns, you can now add tracking templates at the account, campaign, and ad group level along with the product group level.
We recommend adding the tracking template to your account. Then when you want to update a parameter or add a new one, you only need to make the change in one place and it applies to everything in that account.
- From the collapsible menu on the left, select All campaigns > Settings > Account level options.
- For Tracking template, enter one of these items:
- {lpurl} followed by URL parameters and custom parameters which are separated by an ampersand (&). For example, {lpurl}?matchtype={matchtype}&device={device}.
- The URL you received from a third-party tracking tool or service. For example, http://www.trackingc.com/?url={lpurl}&id=5
- Select Save.
- You can’t define custom parameters at the account level, but you can add custom parameters to the account tracking template that are defined at the campaign, ad group, ad, keyword, or sitelink extension level. To learn more, see Can I use custom parameters?
- If you create a tracking template at the campaign, ad group, ad or sitelink extension level, it will override the account tracking template. When your ad is served, the lowest level tracking template will be appended to your landing page URL.
- The tracking template can be up to 2,048 characters.
- Make sure that you select final URL as your Landing page URL.
- In a search campaign, you need to select Final URL as your landing page.
What is URL tracking in Microsoft Advertising?
URL tracking allows you to find out how people got to your website by adding tracking parameters in Microsoft Advertising and then using a third-party tracking tool or service to analyze the data. When an ad is served, the tracking parameters are dynamically appended to your landing page URL. This landing page URL is recorded on your web server and then a third-party tracking tool, like Adobe or Google Analytics, can interpret the data.
There are 5 ways to set up URL tracking in Microsoft Advertising:
- Auto-tagging of UTM tags: When you select the auto-tagging checkbox, 5 UTM tags will be added to the landing page URLs of your text ads, keywords, Microsoft Shopping Campaigns, Image Extensions, and Sitelink Extensions. Learn more: How to set up auto-tagging?
- Auto-tagging of Microsoft Click ID: You can also enable auto-tagging of the Microsoft Click ID separately for conversion tracking.
- Final URL tracking: You manually add URL parameters to your final URLs. With this option, your ad needs to go through editorial review each time you update a parameter.
- Tracking template: You select final URL as your landing page and then add URL parameters to the tracking template. We recommend that you add the tracking template at the account level and then it will be applied to all URLs (ads, keywords, Sitelink Extensions).
- Custom parameters: You select Final URL as your landing page, define custom parameters to track a specific data point, and then add the custom parameter to the tracking template.
Auto-tagging of UTM tags and Microsoft Click ID are two separate features. In order to use these features together, both must be enabled at the same time.
In your account, you can mix and match which tracking parameters you want to use. Here is how URL tracking options work together when an ad is served:
- Microsoft Advertising passes parameters from the lowest level tracking template or final URL.
- Auto-tagging appends the UTM tags or Microsoft Click IDs at the end of the URL, after any URL parameters.
More: https://help.ads.microsoft.com/#apex/ads/en/n5013/2